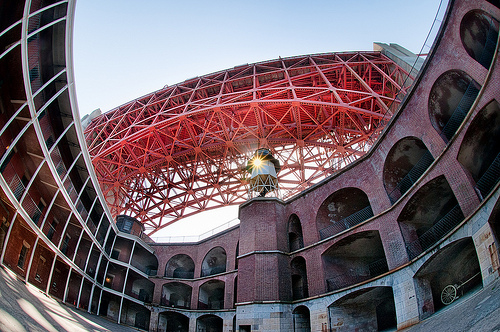
On the fly, while leading a small group of photographers to shoot the Golden Gate during full moonrise, I grabbed this fisheye shot of Fort Point with the Golden Gate Bridge against the sky in the background. A sunburst was coming through the old lighthouse atop the Fort Point ramparts, leading to a scene with fairly extreme dynamic range.
This is an image that renders the full on light of the sun at the same time as it show details in the deep shadow areas in the niches of the fort. You can click on the photo to view it larger so you can really see what I mean.

I exposed for the sky, and in the default rendering the foreground was pretty dark. To recover the situation, I processed a second, lighter version of the file for the foreground. I used a layer mask and a gradient to combine the two versions in Photoshop. This is an example of what I mean by multi-RAW processing.
The Fort Point shadow areas were still pretty dark, so I processed a third even lighter versions, aligned it on top of the two previous versions, set the Blending Mode to Screen, and masked it out. I then “painted” selective areas of this very much lighter layer in.
Theoretically, a single RAW file contains data providing a dynamic range from -4 EV to +4EV of the actual exposure. You can pick and choose which part of this enormous dynamic range you want to use for which parts of your image, but the entire dynamic range is not all usable. In this case, my processing added quite a bit of noise to the dark shadow areas that I had lightened, so I needed to selectively process for noise.