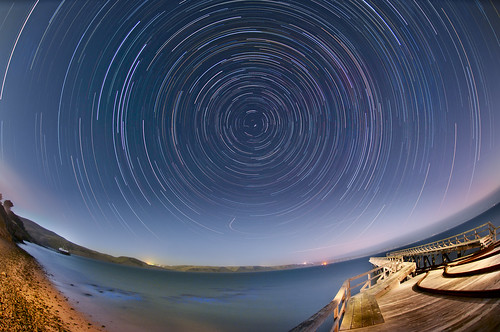
Star Trails over Drakes Bay, photo by Harold Davis. View this image larger.
I made this image as a demonstration of star stacking for a recent night photography workshop I gave on Point Reyes. Before I explain how I made this image, you might be interested in some general information about star stacking, my workshop schedule, and what participants have said about my workshops.
Here’s the back story: Usually, a highlight of the Point Reyes night photography workshop is a visit after dark to the Point Reyes Lighthouse. Unfortunately, high winds forced the Park Service to close the stairs down to the lighthouse. I took the workshop group over to the platform above the Lighthouse, hoping that it might be relatively sheltered—but, no go. The platform was intolerably windy, and not conditions under which one could set up a tripod for stability.
So we went down to Drakes Beach, and sheltered on the leeward side of the bluffs, photographing moonlight on the waves. Fairly early—by night photography standards—we headed back to the historic Coastguard Boathouse, workshop central for the weekend.
From the Boathouse side of Drakes Bay, I noticed that things were fairly clear. There was also some shelter from the wind on one side of the building and a straight shot north. I dropped an extension tube out the window of my bedroom, attached a DC converter to run my camera, and positioned the camera in the corner of the building. I threw my 10.5mm digital fisheye lens on the camera to get as wide a field of view as possible, and also to maximize the star trails.
Workshop parrticipant and photographer Mark Lohman came outside to help me frame the image, but neither of us could really see anything in the dark. So I ran off a high ISO test shot at 30 seconds, f/4, and ISO 2,500.
The test exposure looked pretty good—maybe a little on the bright side—so I figured that 4 minutes at f/4 and ISO 200 would work fine for the real thing. This is about what I had expected, but it was nice to have it confirmed before firing off several hours worth of exposures—also, the test allowed me to confirm the composition. Note that I centered the composition on Polaris, the North Star, to get the most circular star trails.
Before making the exposures, I used my Bulb setting and my interval timer to make an exposure that I planned to use later for the foreground at 8 minutes (also at f/4 and ISO 200):
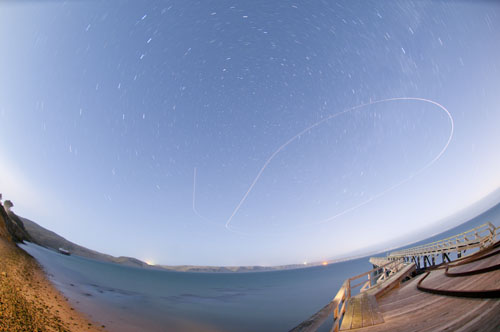
There was a small airplane fooling around in the sky (the swooping line) but this didn’t really matter as I was only going to use the exposure for the foreground.
Next, I used my interval timer to make 40 4 minute exposures. The interval timer settings were: no interval before exposures started; exposure length 4 minutes; interval between exposures 4 minutes and 1 second (unintuitively, on my timer this runs from the start of the previous exposure, not its conclusion); 40 repetitions.
Then I went to bed, listening to the wind howl outside and the waves crashing.
I woke some time in the middle of the night (I didn’t have a watch) and threw on the minimum of clothing. Outside, wind was still blowing, but camera and tripod still seemed to be in position. The 2 hours and 40 minutes of exposures had finished. I brought my camera back inside and went to bed.
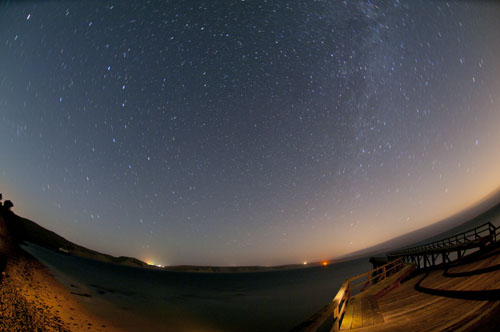
Running through the captures in slide show mode was kind of like a “flip book”—because I could see the stars wheeling in the heavens around Polaris (the North Star). Here’s the way a pretty typical exposure looked when I viewed the set in Adobe Bridge:
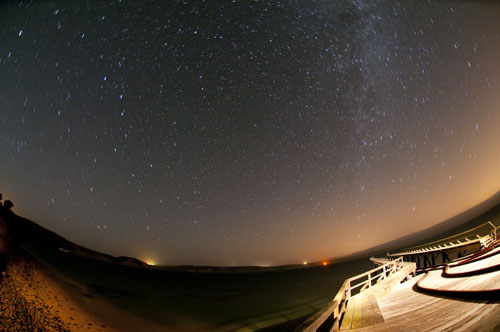
Looking through the captures, I saw that the pier was lit a couple of times, once when a couple of workshop participants who’d stayed a little later at Drakes got home and the car headlights shone briefly on the pier, and once when someone was fooling around with light painting the pier. Here’s the headlight frame:
In the classroom, I made obeisance to the Photoshop Gods with the hope that the process would actually work. I opened the 40 images via Adobe Bridge, applying the same setting to eash one in Adobe Camera RAW (ACR). Next, I showed how to open the Statistics Script (avaibale in the extended versions of CS3 and later).
I added the 40 open files in the Statistics dialog and chose the Maximum method for combining the images. Then the workshop had lunch while my laptop chugged its way through the massive processing this required. Here’s the background that resulted:
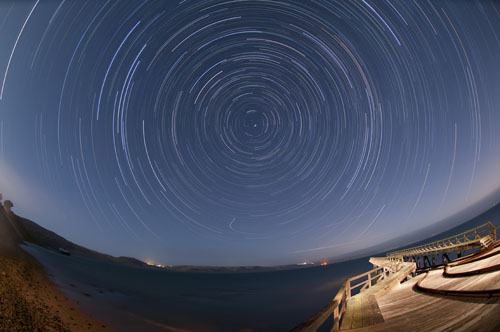
You can see in the background that the frame in the stack with headlights lightened the pier, but the rest of the foreground needed some work. I finished the image by layering in the 8 minute exposure to use as a foreground, adjusting the colors, and selectively sharpening—with the results shown at the top of this story and below.

Star Trails over Drakes Bay, photo by Harold Davis. View this image larger.
Pingback: Snake Skin | Photoblog 2.0
Pingback: From Sunset to Sunrise | Photoblog 2.0